WebRTC, PHP Larave
https://www.metered.ca/blog/building-a-group-video-chat-app-with-webrtc-and-php-laravel/
https://github.com/metered-ca/video-chat-app-php-laravel
Visión general
Discutiremos las tecnologías necesarias para crear videollamadas grupales, aprenderemos sobre WebRTC y sus limitaciones para desarrollar una videollamada grupal con una gran cantidad de participantes y cómo podemos evitar las limitaciones.
Luego, construiremos una aplicación de videoconferencia grupal altamente escalable con WebRTC PHP+Laravel backend y Livewire.
¿Por qué WebRTC?
WebRTC es una colección de protocolos y tecnologías que permite la comunicación en tiempo real.
Proporciona una forma de tener comunicación de audio y video en tiempo real sin complementos con una latencia muy baja directamente desde el navegador.
Por lo tanto, utilizaremos WebRTC para crear una experiencia de videollamadas sin complementos perfecta para el usuario, y permitir que el usuario tenga una videollamada directamente desde su navegador sin instalar ningún software o complementos.
WebRTC fue diseñado para tener comunicación punto a punto entre los participantes en una llamada WebRTC.
Pero las llamadas de WebRTC no son completamente punto a punto, se requiere un servidor centralizado para que los pares se descubran entre sí, y si los pares están detrás de un NAT, entonces se requieren servidores STUN/TURN para NAT Traversal .
En la siguiente sección, abordaremos brevemente estas tecnologías.
Bloques de construcción de WebRTC
WebRTC tiene muchos componentes, y muchos de esos componentes son manejados automáticamente por el navegador subyacente.
Pero discutiremos sobre los dos componentes que requieren un servidor centralizado para operar, y son:
- Servidor de señalización WebRTC
- Servidor STUN/TURN
Servidor de señalización WebRTC
Se requiere un servidor de señalización WebRTC para que los pares se descubran entre sí e intercambien la información SDP y los candidatos ICE para establecer una sesión de igual a igual.
Se deja al usuario construir su propio servidor de señalización. El servidor de señalización se construye típicamente usando WebSockets.
Servidor STUN/TURN
Se requiere el servidor STUN/TURN para NAT Traversal. La mayoría de los dispositivos de consumo en estos días, ya sea su computadora portátil o su teléfono inteligente, generalmente están detrás de un NAT.
Para conectarse a Internet se requiere una dirección IP pública, su proveedor de servicios de Internet le asigna la dirección IP pública.
Para cada dispositivo que posea, necesitaría una dirección IP pública, pero actualmente hay más dispositivos conectados a Internet que las direcciones IPv4 disponibles.
Para resolver este problema se inventó NAT, NAT permite que múltiples dispositivos compartan una dirección IP pública.
La traducción de direcciones de red o NAT generalmente la realiza su enrutador o módem proporcionado por su ISP.
En WebRTC establecemos una conexión directa entre los dos dispositivos, pero ambos dispositivos suelen estar detrás de un NAT y necesitamos un mecanismo para atravesar el NAT y conectarnos directamente a esos dispositivos.
Para ello utilizamos los servidores STUN y TURN.
Limitaciones y consideraciones de escala
Como hemos discutido, WebRTC funciona de igual a igual, donde cada participante en una reunión de WebRTC se conecta con todos los demás pares en la reunión.
Esta topología es buena para llamadas uno a uno, o incluso para llamadas con 3 participantes, pero genera demasiada carga en el ancho de banda de carga y la CPU para llamadas con más de 3 participantes.
Porque, si hay, por ejemplo, 10 personas en una llamada, entonces cada participante tendría que cargar su video+audio a otros 9 participantes simultáneamente, lo que supone una enorme carga para la CPU y el ancho de banda.
Para escalar una llamada WebRTC, necesita un servidor WebRTC , lo que hace el servidor WebRTC es agregar el flujo de audio y video de todos los participantes y distribuirlo a otros en la llamada.
Entonces, si consideramos nuestro ejemplo anterior con 10 participantes si usamos un servidor WebRTC, entonces el usuario tendría que cargar su audio + video al servidor WebRTC.
En lugar de cargar el video a otros 9 participantes, solo habrá una carga, que es al servidor WebRTC y reduce significativamente la carga en la CPU y el ancho de banda.
Esto hace posible escalar fácilmente la llamada WebRTC a cientos de participantes.
En nuestro tutorial usaremos el servidor WebRTC de Metered Video .
Creación de una aplicación de chat de video
Comencemos a construir una aplicación de videollamadas grupales altamente escalable con WebRTC y PHP Laravel.
Primero comenzaremos con la construcción del servidor backend de la aplicación, el servidor backend tendrá API para crear una sala de reuniones, donde otros participantes pueden unirse.
También crearemos una API para validar la sala de reuniones, de modo que cuando un usuario quiera unirse a una sala de reuniones, podamos verificar si la sala existe o no.
En el backend de PHP, llamaremos al SDK de video medido para crear una reunión y también para validar la sala de reuniones.
Requisito previo
Necesitará conocimientos básicos de PHP, HTML y JavaScript para desarrollar esta aplicación.
También necesitará una cuenta de video medido, si no tiene una cuenta, regístrese para obtener una cuenta gratuita en metered.ca y haga clic en "Registrarse y comenzar a construir"
Después de haber creado su cuenta, regrese aquí y síganos.
Dominio medido y clave secreta
Obtengamos el dominio medido y la clave secreta, los necesitaremos más adelante en el proyecto.
Para obtener su Dominio medido y Clave secreta, inicie sesión en su Tablero medido y haga clic en "Desarrolladores" en la barra lateral.
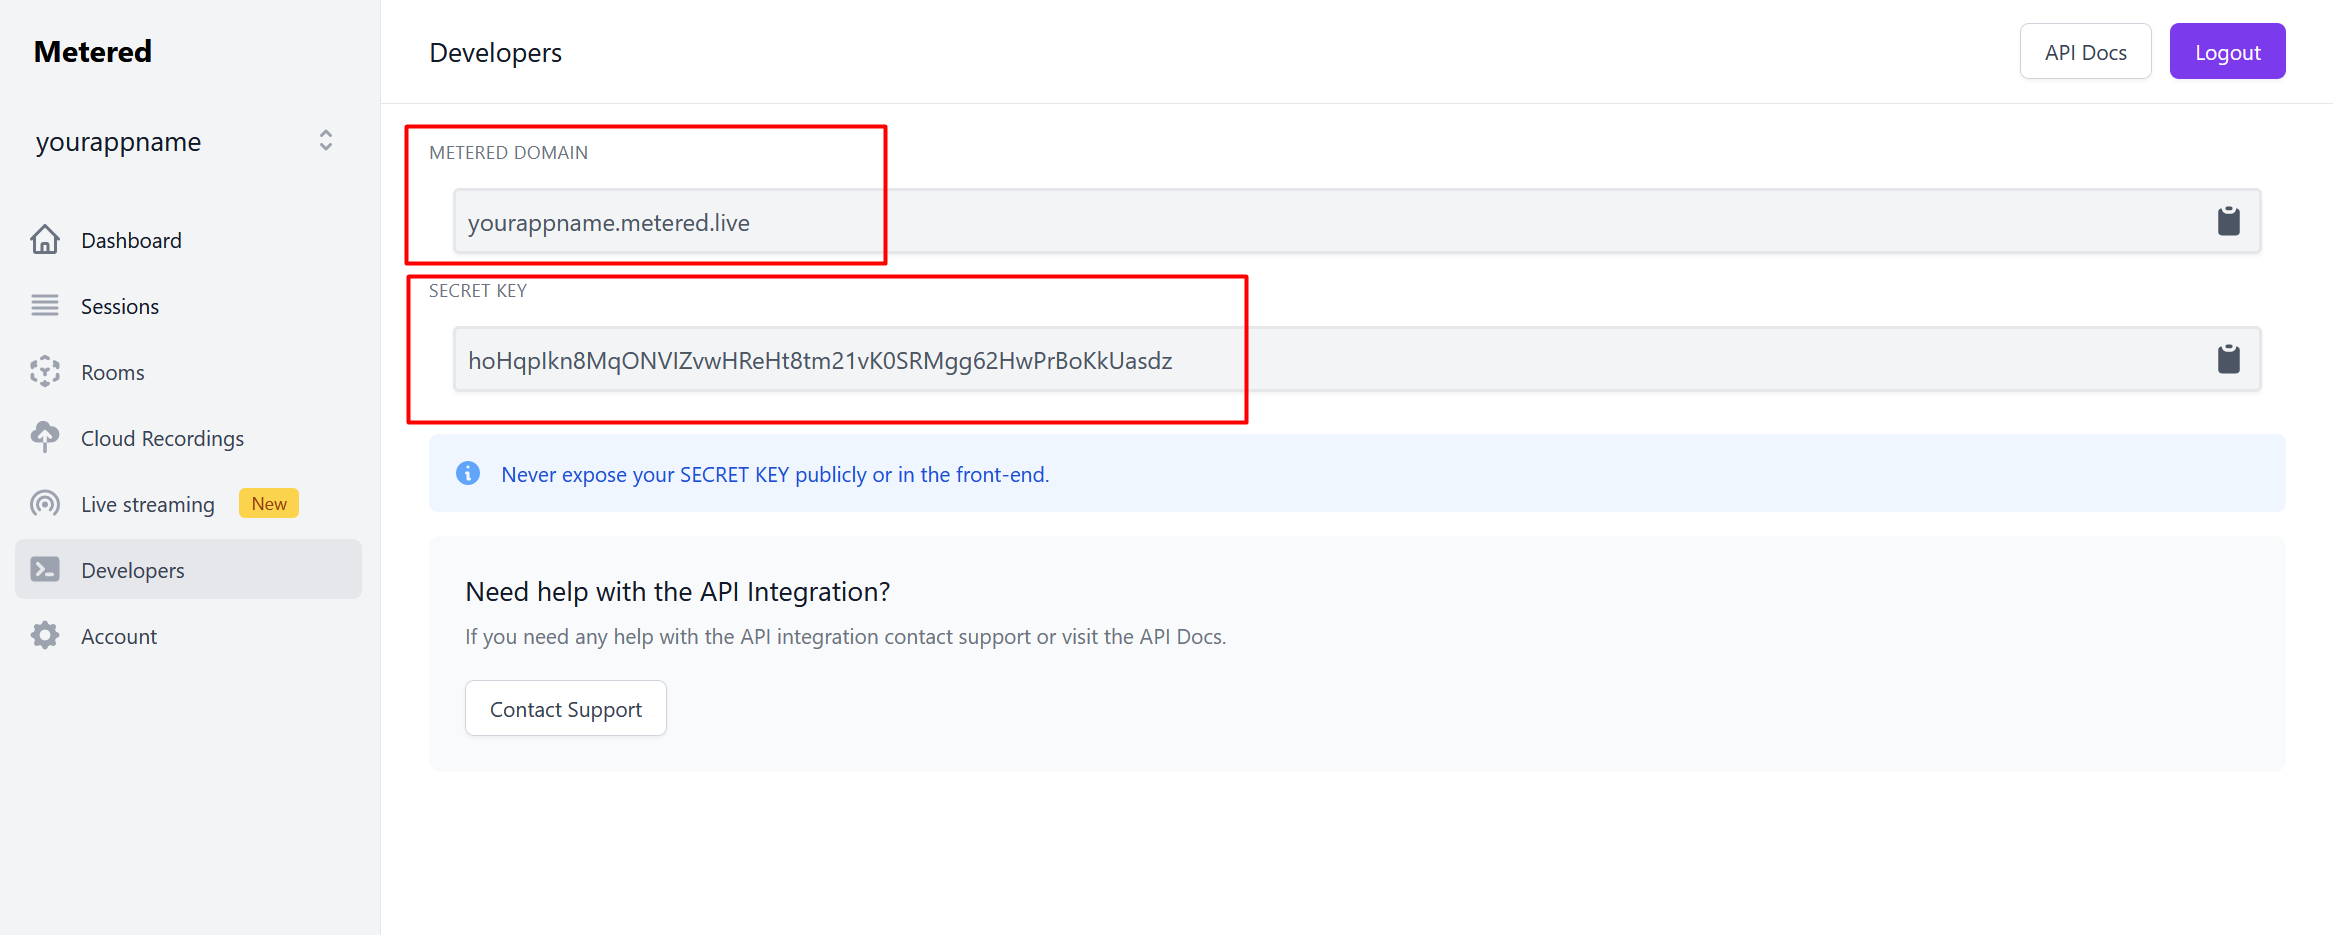
Anote el dominio medido y la clave secreta, los usaremos más adelante en el tutorial.
Andamiaje del proyecto
Vamos a montar el proyecto php Laravel ejecutando el comando
laravel new webrtc-php-laravelE inicie el servidor usando
php artisan serve
Una vez que hayamos estructurado el proyecto, comencemos a construir nuestra aplicación de chat de video.
Creación de la página Unirse a la reunión
Actualizaremos la vista de la página de inicio para crear la interfaz para unirse o crear una nueva reunión.
Actualice la vista de la página de inicio resources/views/welcome.blade.phpy cree la interfaz de usuario para crear una nueva reunión o unirse a una reunión existente.
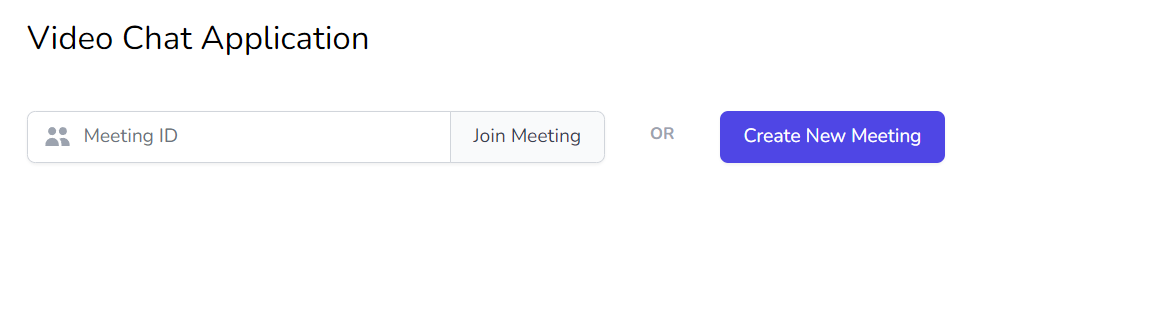
Vamos a montar la IU básica, la usaremos tailwindcsspara nuestro estilo, aquí está la IU básica
<!DOCTYPE html>
<html lang="{{ str_replace('_', '-', app()->getLocale()) }}">
    <head>
        <meta charset="utf-8">
        <meta name="viewport" content="width=device-width, initial-scale=1">

        <title>Laravel</title>

        <!-- Fonts -->
        <link href="https://fonts.googleapis.com/css2?family=Nunito:wght@400;600;700&display=swap" rel="stylesheet">


        <style>
            body {
                font-family: 'Nunito', sans-serif;
            }
        </style>

        @vite(['resources/css/app.css', 'resources/js/app.js'])

    </head>
    <body class="antialiased">

        <div class="max-w-7xl mx-auto sm:px-6 lg:px-8">
            <div class="py-4">
                <h1 class="text-2xl">Video Chat Application</h1>
            </div>

            <div class="max-w-2xl">
                <div>
                    <label for="name" class="block text-sm font-medium text-gray-700">Name</label>
                    <div class="mt-1">
                        <input type="text" name="name" id="name" class="shadow-sm focus:ring-indigo-500 focus:border-indigo-500 block w-full sm:text-sm border-gray-300 rounded-md" placeholder="John Smith">
                    </div>
                </div>
            </div>
            <div class="max-w-2xl">
                <div class="grid md:grid-cols-3 grid-cols-1 mt-4">
                    <div class="col-span-2">
                        <div class="mt-1 flex rounded-md shadow-sm">
                          <div class="relative flex items-stretch flex-grow focus-within:z-10">
                            <div class="absolute inset-y-0 left-0 pl-3 flex items-center pointer-events-none">
                              <!-- Heroicon name: solid/users -->
                              <svg class="h-5 w-5 text-gray-400" xmlns="http://www.w3.org/2000/svg" viewBox="0 0 20 20" fill="currentColor" aria-hidden="true">
                                <path d="M9 6a3 3 0 11-6 0 3 3 0 016 0zM17 6a3 3 0 11-6 0 3 3 0 016 0zM12.93 17c.046-.327.07-.66.07-1a6.97 6.97 0 00-1.5-4.33A5 5 0 0119 16v1h-6.07zM6 11a5 5 0 015 5v1H1v-1a5 5 0 015-5z" />
                              </svg>
                            </div>
                            <input type="text" name="meetingId" id="meetingId" class="focus:ring-indigo-500 focus:border-indigo-500 block w-full rounded-none rounded-l-md pl-10 sm:text-sm border-gray-300" placeholder="Meeting ID">
                          </div>
                          <button type="button" class="-ml-px relative inline-flex items-center space-x-2 px-4 py-2 border border-gray-300 text-sm font-medium rounded-r-md text-gray-700 bg-gray-50 hover:bg-gray-100 focus:outline-none focus:ring-1 focus:ring-indigo-500 focus:border-indigo-500">
                            <span>Join Meeting</span>
                          </button>
                        </div>
                      </div>

                      <div>
                        <span class="text-xs uppercase font-bold text-gray-400 px-1">OR</span>
                        <button type="button" class="mt-1 inline-flex items-center px-4 py-2 border border-transparent text-sm font-medium rounded-md shadow-sm text-white bg-indigo-600 hover:bg-indigo-700 focus:outline-none focus:ring-2 focus:ring-offset-2 focus:ring-indigo-500">Create New Meeting</button>
                    </div>
                </div>

            </div>

        </div>
    </body>
</html>
Ahora construyamos la lógica para manejar la página Unirse a la reunión.
Crearemos dos rutas, una para manejar Unirse a la reunión y la segunda para manejar Crear nueva reunión .
En la ruta Unirse a la reunión , llamaremos al SDK de video medido para validar lo meetingIDproporcionado por el usuario, si meetingIDes válido, redirigiremos al usuario al Área de reunión, de lo contrario, mostraremos un error.
Para la ruta Crear reunión , llamaremos a la API Crear sala del SDK de video medido y luego redirigiremos al usuario al Área de reunión.
Crear reunión
Envolvamos el botón "Crear reunión" en una etiqueta de formulario y con una ruta de acción acreateMeeting
<div>
<span class="text-xs uppercase font-bold text-gray-400 px-1">OR</span>
<form method="post" action="{{ route('createMeeting') }}">
    {{ csrf_field() }}
    <button type="submit" class="mt-1 inline-flex items-center px-4 py-2 border border-transparent text-sm font-medium rounded-md shadow-sm text-white bg-indigo-600 hover:bg-indigo-700 focus:outline-none focus:ring-2 focus:ring-offset-2 focus:ring-indigo-500">Create New Meeting</button>
</form>
</div>
Vamos a crear un controlador para manejar todos nuestros métodos relacionados con la reunión.
php artisan make:controller MeetingController<?php
namespace App\Http\Controllers;
use Illuminate\Http\Request;
class MeetingController extends Controller
{
//
public function createMeeting(Request $request) {
// Contain the logic to create a new meeting
}
}
Actualizaremos nuestro web.phparchivo también e incluiremos la createMeetingruta y llamaremos al createMeetingmétodo de nuestro MeetingControlleren la ruta.
<?php

use Illuminate\Support\Facades\Route;

use App\Http\Controllers\MeetingController;
/*
|--------------------------------------------------------------------------
| Web Routes
|--------------------------------------------------------------------------
|
| Here is where you can register web routes for your application. These
| routes are loaded by the RouteServiceProvider within a group which
| contains the "web" middleware group. Now create something great!
|
*/

Route::get('/', function () {
    return view('welcome');
});

Route::post("/createMeeting", [MeetingController::class, 'createMeeting'])->name("createMeeting");Recuerde que anteriormente en este tutorial hemos anotado el dominio medido y la clave secreta medida , ahora los usaremos.
En el .envarchivo agregue el METERED_DOMAINy elMETERED_SECRET_KEY
METERED_DOMAIN="yourappname.metered.live"
METERED_SECRET_KEY="hoHqpIkn8MqZvwHReHt8tm_6K0SRMgg6vHwPrBoKkUhz"
Ahora, volvamos a nuestro MeetingController.phpy llamemos a la API Create Room
<?php

namespace App\Http\Controllers;

use Illuminate\Http\Request;
use Illuminate\Support\Facades\Http;
use Illuminate\Support\Facades\Log;


class MeetingController extends Controller
{
    //

    public function createMeeting(Request $request) {
        $METERED_DOMAIN = env('METERED_DOMAIN');
        $METERED_SECRET_KEY = env('METERED_SECRET_KEY');

        Log::info("https://{$METERED_DOMAIN}/api/v1/room?secretKey={$METERED_SECRET_KEY}");

        // Contain the logic to create a new meeting
        $response = Http::post("https://{$METERED_DOMAIN}/api/v1/room?secretKey={$METERED_SECRET_KEY}", [
            'autoJoin' => true
        ]);

        $roomName = $response->json("roomName");

        return redirect('/'); // We will update this soon.
    }
}
En el código anterior, llamamos a la API REST " Crear sala " del SDK de video medido para crear una nueva reunión.
Unirse a una reunión existente
Ahora vamos a manejar la lógica del botón Unirse a la reunión . Aquí el usuario ingresará el ID de la reunión y nosotros validaremos el ID de la reunión.
Si la ID de la reunión es válida, redirigiremos al usuario a la página de la reunión; si la ID de la reunión no es válida, mostraremos un error.
Abra el MeetingController.phparchivo y cree un método llamado validateMeeting, este método llamará a la API Get Room del SDK de video medido y verificará si existe o no una sala de reuniones especificada por el usuario.
    public function validateMeeting(Request $request) {
        $METERED_DOMAIN = env('METERED_DOMAIN');
        $METERED_SECRET_KEY = env('METERED_SECRET_KEY');

        $meetingId = $request->input('meetingId');

        // Contains logic to validate existing meeting
        $response = Http::get("https://{$METERED_DOMAIN}/api/v1/room/{$meetingId}?secretKey={$METERED_SECRET_KEY}");

        if ($response->status() === 200)  {
            return redirect("/"); // We will update this soon
        } else {
            return redirect("/?error=Invalid Meeting ID");
        }
    }
Abra web.phpy cree una /validateMeetingruta, y llame al validateMeetingmétodo del MeetingController.
Route::post("/validateMeeting", [MeetingController::class, 'validateMeeting'])->name("validateMeeting");
Ahora abra welcome.blade.phpy envuelva el botón Unirse a la reunión y la etiqueta de entrada en un campo de formulario y llame a la validateMeetingruta.
<form method="post" action="{{ route('validateMeeting') }}">
{{ csrf_field() }}
<div class="mt-1 flex rounded-md shadow-sm">
<div class="relative flex items-stretch flex-grow focus-within:z-10">
<div class="absolute inset-y-0 left-0 pl-3 flex items-center pointer-events-none">
<svg class="h-5 w-5 text-gray-400" xmlns="http://www.w3.org/2000/svg" viewBox="0 0 20 20" fill="currentColor" aria-hidden="true">
<path d="M9 6a3 3 0 11-6 0 3 3 0 016 0zM17 6a3 3 0 11-6 0 3 3 0 016 0zM12.93 17c.046-.327.07-.66.07-1a6.97 6.97 0 00-1.5-4.33A5 5 0 0119 16v1h-6.07zM6 11a5 5 0 015 5v1H1v-1a5 5 0 015-5z" />
</svg>
</div>
<input type="text" name="meetingId" id="meetingId" class="focus:ring-indigo-500 focus:border-indigo-500 block w-full rounded-none rounded-l-md pl-10 sm:text-sm border-gray-300" placeholder="Meeting ID">
</div>
<button type="submit" class="-ml-px relative inline-flex items-center space-x-2 px-4 py-2 border border-gray-300 text-sm font-medium rounded-r-md text-gray-700 bg-gray-50 hover:bg-gray-100 focus:outline-none focus:ring-1 focus:ring-indigo-500 focus:border-indigo-500">
<span>Join Meeting</span>
</button>
</div>
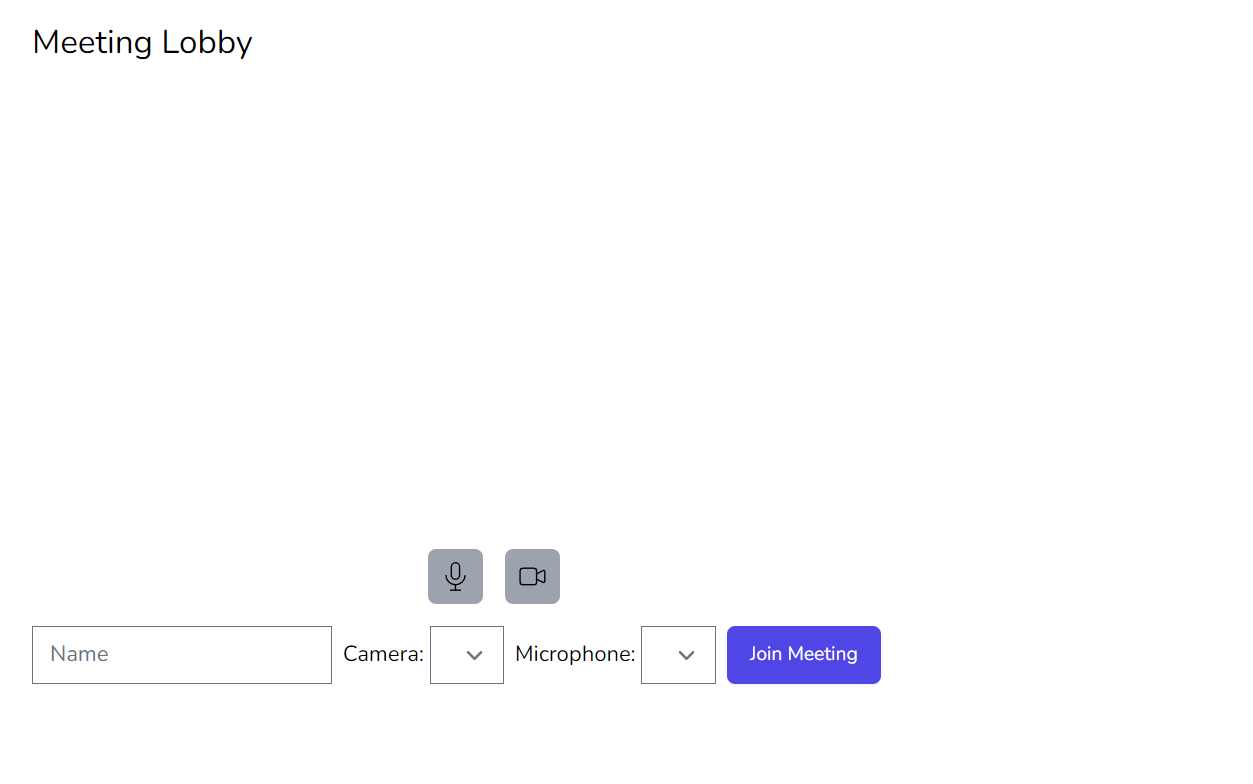
</form>Creación de la página de la reunión
Luego redirigiremos al usuario a la página de la reunión. En la página Reunión, primero mostraremos el Lobby de reunión del usuario.
En el Lobby de la reunión, el usuario puede ajustar su cámara, altavoz y micrófono y unirse a la reunión.
Crearemos una vista llamada como meeting.blade.phpen esta vista crearemos la interfaz de usuario para la reunión
Vaya a resources/viewsy cree un archivo llamado meeting.blade.phpy agregue los siguientes contenidos al archivo
<!DOCTYPE html>
<html lang="{{ str_replace('_', '-', app()->getLocale()) }}">
    <head>
        <meta charset="utf-8">
        <meta name="viewport" content="width=device-width, initial-scale=1">

        <title>Laravel</title>

        <!-- Fonts -->
        <link href="https://fonts.googleapis.com/css2?family=Nunito:wght@400;600;700&display=swap" rel="stylesheet">


        <style>
            body {
                font-family: 'Nunito', sans-serif;
            }
        </style>

        <script src="https://cdn.metered.ca/sdk/video/1.4.5/sdk.min.js"></script>

        @vite(['resources/css/app.css', 'resources/js/app.js'])

    </head>
    <body class="antialiased">

        <div class="max-w-7xl mx-auto sm:px-6 lg:px-8">
            <div class="py-4">
                <h1 class="text-2xl">Meeting Lobby</h1>
            </div>


            <div class="max-w-2xl">


            </div>

        </div>
    </body>
</html>
Hemos incluido el SDK de video medido en el encabezado del archivo.
<script src="https://cdn.metered.ca/sdk/video/1.4.5/sdk.min.js"></script>Ahora abra el archivo routes/web.phpy cree la ruta para el vestíbulo.
Route::get("/meeting/{meetingId}", function() {
    return view('meeting');
});
Nuestro web.phparchivo se ve así
<?php

use Illuminate\Support\Facades\Route;

use App\Http\Controllers\MeetingController;
/*
|--------------------------------------------------------------------------
| Web Routes
|--------------------------------------------------------------------------
|
| Here is where you can register web routes for your application. These
| routes are loaded by the RouteServiceProvider within a group which
| contains the "web" middleware group. Now create something great!
|
*/

Route::get('/', function () {
    return view('welcome');
});

Route::post("/createMeeting", [MeetingController::class, 'createMeeting'])->name("createMeeting");

Route::post("/validateMeeting", [MeetingController::class, 'validateMeeting'])->name("validateMeeting");

Route::get("/meeting/{meetingId}", function() {
    return view('meeting');
});Deje que abra el MeetingController.phparchivo y redirija al usuario /meeting/{meetingId}después de crear o unirse a una reunión con éxito.
<?php

namespace App\Http\Controllers;

use Illuminate\Http\Request;
use Illuminate\Support\Facades\Http;
use Illuminate\Support\Facades\Log;


class MeetingController extends Controller
{

    public function createMeeting(Request $request) {

        $METERED_DOMAIN = env('METERED_DOMAIN');
        $METERED_SECRET_KEY = env('METERED_SECRET_KEY');


        // Contain the logic to create a new meeting
        $response = Http::post("https://{$METERED_DOMAIN}/api/v1/room?secretKey={$METERED_SECRET_KEY}", [
            'autoJoin' => true
        ]);

        $roomName = $response->json("roomName");

        return redirect("/meeting/{$roomName}"); // We will update this soon.
    }

    public function validateMeeting(Request $request) {
        $METERED_DOMAIN = env('METERED_DOMAIN');
        $METERED_SECRET_KEY = env('METERED_SECRET_KEY');

        $meetingId = $request->input('meetingId');

        // Contains logic to validate existing meeting
        $response = Http::get("https://{$METERED_DOMAIN}/api/v1/room/{$meetingId}?secretKey={$METERED_SECRET_KEY}");

        $roomName = $response->json("roomName");


        if ($response->status() === 200)  {
            return redirect("/meeting/{$roomName}"); // We will update this soon
        } else {
            return redirect("/?error=Invalid Meeting ID");
        }
    }
}
Actualicemos el meeting.blade.phparchivo para crear la interfaz de usuario básica del lobby.
<!DOCTYPE html>
<html lang="{{ str_replace('_', '-', app()->getLocale()) }}">
    <head>
        <meta charset="utf-8">
        <meta name="viewport" content="width=device-width, initial-scale=1">

        <title>Laravel</title>

        <!-- Fonts -->
        <link href="https://fonts.googleapis.com/css2?family=Nunito:wght@400;600;700&display=swap" rel="stylesheet">


        <style>
            body {
                font-family: 'Nunito', sans-serif;
            }
        </style>

        <script src="https://cdn.metered.ca/sdk/video/1.4.5/sdk.min.js"></script>

        @vite(['resources/css/app.css', 'resources/js/app.js'])

    </head>
    <body class="antialiased">

        <div class="max-w-7xl mx-auto sm:px-6 lg:px-8">
            <div class="py-4">
                <h1 class="text-2xl">Meeting Lobby</h1>
            </div>


            <div class="max-w-2xl">

                <video id='localVideo' class="w-full" autoplay muted></video>

                <div class="flex space-x-4 mb-4 justify-center">

                    <button id='toggleMicrophone' class="bg-gray-400 w-10 h-10 rounded-md p-2">
                        <svg className="w-6 h-6" fill="none" stroke="currentColor" viewBox="0 0 24 24" xmlns="http://www.w3.org/2000/svg"><path strokeLinecap="round" strokeLinejoin="round" strokeWidth={2} d="M19 11a7 7 0 01-7 7m0 0a7 7 0 01-7-7m7 7v4m0 0H8m4 0h4m-4-8a3 3 0 01-3-3V5a3 3 0 116 0v6a3 3 0 01-3 3z" /></svg>
                    </button>

                    <button id='toggleCamera' class="bg-gray-400 w-10 h-10 rounded-md p-2">
                        <svg className="w-6 h-6" fill="none" stroke="currentColor" viewBox="0 0 24 24" xmlns="http://www.w3.org/2000/svg"><path strokeLinecap="round" strokeLinejoin="round" strokeWidth={2} d="M15 10l4.553-2.276A1 1 0 0121 8.618v6.764a1 1 0 01-1.447.894L15 14M5 18h8a2 2 0 002-2V8a2 2 0 00-2-2H5a2 2 0 00-2 2v8a2 2 0 002 2z" /></svg>                    </button>
                    </button>

                </div>
                <div class="flex space-x-2">
                    <input type="text"  placeholder="Name"/>

                    <label>
                        Camera:
                        <select id='cameraSelectBox'>
                        </select>
                    </label>

                    <label>
                        Microphone:
                        <select id='microphoneSelectBox'>
                        </select>
                    </label>

                    <button id='joinMeetingBtn' class="inline-flex items-center px-4 py-2 border border-transparent text-sm font-medium rounded-md shadow-sm text-white bg-indigo-600 hover:bg-indigo-700 focus:outline-none focus:ring-2 focus:ring-offset-2 focus:ring-indigo-500">
                        Join Meeting
                    </button>
                </div>

            </div>

        </div>
    </body>
</html>
Construyendo el código JavaScript
Usaremos javascript vainilla con algo de jquery para construir el front-end de nuestra aplicación.
Inicialización del objeto de reunión medido
Abrir resources/js/app.jsy crear el objeto de reunión
const meeting = new Metered.Meeting();Población de cámaras y micrófonos disponibles
Llamaremos al método listVideoInputDevices para obtener una lista de cámaras disponibles y al método listAudioInputDevices para obtener la lista de micrófonos disponibles en el sistema.
Llamaremos a estos métodos y completaremos el cuadro de selección
import './bootstrap';
import jquery from 'jquery';

let meetingJoined = false;
const meeting = new Metered.Meeting();

async function initializeView() {
    /**
     * Populating the cameras
     */
     const videoInputDevices = await meeting.listVideoInputDevices();
     const videoOptions = [];
     for (let item of videoInputDevices) {
        videoOptions.push(
            `<option value="${item.deviceId}">${item.label}</option>`
        )
     }
    jquery("#cameraSelectBox").html(videoOptions.join(""));

    /**
     * Populating Microphones
     */
    const audioInputDevices = await meeting.listAudioInputDevices();
    const audioOptions = [];
    for (let item of audioInputDevices) {
        audioOptions.push(
            `<option value="${item.deviceId}">${item.label}</option>`
        )
    }
    jquery("#microphoneSelectBox").html(audioOptions.join(""));
}

initializeView();
Manejo Área de espera Compartir cámara/micrófono
Hemos creado dos botones, uno para cámara y otro para micrófono. Cuando el usuario haga clic en estos botones, compartiremos la cámara y cuando el usuario haga clic en el botón del micrófono, compartiremos el micrófono después de que el usuario se una a la reunión.
Para construir esta lógica, agregaremos un detector de eventos de clic a estos botones y almacenaremos el estado en una variable, para la cámara crearemos una variable llamada como cameraOny para el micrófono crearemos una variable llamada comomicOn
En el caso de la cámara, también queremos mostrar la vista previa del video de la cámara al usuario, para eso almacenaremos la secuencia de video en forma localVideoStreamvariable y la mostraremos en una etiqueta de video.
    /**
     * Mute/Unmute Camera and Microphone
     */
    let micOn = false;
    jquery("#waitingAreaToggleMicrophone").on("click", function() {
        if (micOn) {
            micOn = false;
            jquery("#waitingAreaToggleMicrophone").removeClass("bg-gray-500");
            jquery("#waitingAreaToggleMicrophone").addClass("bg-gray-400");
        } else {
            micOn = true;
            jquery("#waitingAreaToggleMicrophone").removeClass("bg-gray-400");
            jquery("#waitingAreaToggleMicrophone").addClass("bg-gray-500");
        }
    });

    let cameraOn = false;
    let localVideoStream = null;
    jquery("#waitingAreaToggleCamera").on("click", async function() {
        if (cameraOn) {
            cameraOn = false;
            jquery("#waitingAreaToggleCamera").removeClass("bg-gray-500");
            jquery("#waitingAreaToggleCamera").addClass("bg-gray-400");
            const tracks = localVideoStream.getTracks();
            tracks.forEach(function (track) {
              track.stop();
            });
            localVideoStream = null;
            jquery("#waitingAreaLocalVideo")[0].srcObject = null;
        } else {
            cameraOn = true;
            jquery("#waitingAreaToggleCamera").removeClass("bg-gray-400");
            jquery("#waitingAreaToggleCamera").addClass("bg-gray-500");
            localVideoStream = await meeting.getLocalVideoStream();
            jquery("#waitingAreaLocalVideo")[0].srcObject = localVideoStream;
            cameraOn = true;
        }
    });
Después de que el usuario se una a la reunión, comprobaremos el estado de estas variables. Si la cameraOnvariable se establece en verdadero, compartiremos la cámara del usuario y si la micOnvariable se establece en verdadero, compartiremos el micrófono del usuario.
Cambio de dispositivo de manejo
Cambie el micrófono o la cámara seleccionados por el usuario, agregaremos un onChangedetector de eventos en los cuadros de selección de cámara y micrófono que habíamos llenado y llamaremos al método si se cambió la chooseVideoInputDevice(deviceId)cámara y si se cambió el micrófono.chooseAudioInputDevice(deviceId)
    /**
     * Adding Event Handlers
     */
    jquery("#cameraSelectBox").on("change", async function() {
        const deviceId = jquery("#cameraSelectBox").val();
        await meeting.chooseVideoInputDevice(deviceId);
        if (cameraOn) {
            localVideoStream = await meeting.getLocalVideoStream();
            jquery("#waitingAreaLocalVideo")[0].srcObject = localVideoStream;
        }
    });

    jquery("#microphoneSelectBox").on("change", async function() {
        const deviceId = jquery("#microphoneSelectBox").val();
        await meeting.chooseAudioInputDevice(deviceId);
    });
Si se cambia la cámara, también debemos actualizar la localVideoStreamvariable para actualizar la vista previa de la cámara compartida actualmente.
Implementación de unirse a la reunión
Agregaremos un detector de eventos de clic al botón "Unirse a la reunión", cuando se haga clic en el botón, llamaremos al join(options)método del SDK de video medido.
Después de que la unión sea exitosa, ocultaremos el "Área de espera" y mostraremos la vista de la reunión.
También verificaremos si se hace clic en el botón de la cámara y el botón del micrófono en el área de espera; en caso afirmativo, después de unirse a la reunión, compartiremos la cámara y el micrófono.
let meetingInfo = {};
jquery("#joinMeetingBtn").on("click", async function () {
    var username = jquery("#username").val();
    if (!username) {
      return alert("Please enter a username");
    }

    try {
      meetingInfo = await meeting.join({
        roomURL: `${window.METERED_DOMAIN}/${window.MEETING_ID}`,
        name: username,
      });
      console.log("Meeting joined", meetingInfo);
      jquery("#waitingArea").addClass("hidden");
      jquery("#meetingView").removeClass("hidden");
      jquery("#meetingAreaUsername").text(username);

      /**
       * If camera button is clicked on the meeting view
       * then sharing the camera after joining the meeting.
       */
      if (cameraOn) {
        await meeting.startVideo();
      }

      /**
       * Microphone button is clicked on the meeting view then
       * sharing the microphone after joining the meeting
       */
      if (microphoneOn) {
        await meeting.startAudio();
      }

    } catch (ex) {
      console.log("Error occurred when joining the meeting", ex);
    }
  });
Andamiaje de la vista de la reunión
Ahora construiremos la vista de la reunión, la vista de la reunión mostrará el video y el audio de otros participantes.
También mostraremos una vista previa de nuestra propia transmisión de video si estamos compartiendo, y tendremos controles para compartir la cámara, el micrófono y la pantalla.
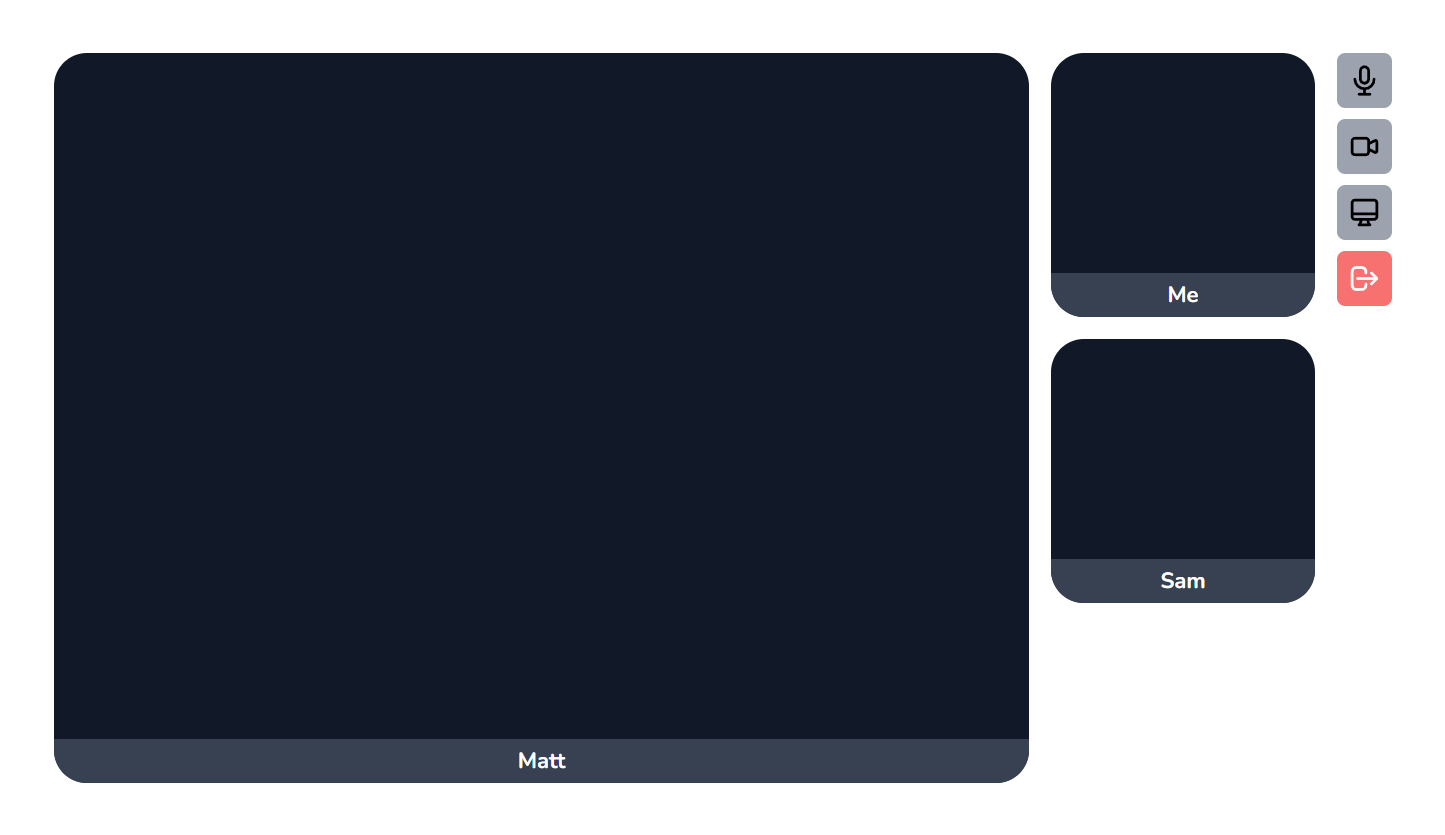
        <div id='meetingView' class="hidden flex w-screen h-screen space-x-4 p-10">

            <div id="activeSpeakerContainer" class=" bg-gray-900 rounded-3xl flex-1 flex relative">
                <video id="activeSpeakerVideo" src="" autoplay class=" object-contain w-full rounded-t-3xl"></video>
                <div id="activeSpeakerUsername" class="hidden absolute h-8 w-full bg-gray-700 rounded-b-3xl bottom-0 text-white text-center font-bold pt-1">

                </div>
            </div>

            <div id="remoteParticipantContainer" class="flex flex-col space-y-4">
                <div id="localParticiapntContainer" class="w-48 h-48 rounded-3xl bg-gray-900 relative">
                    <video id="localVideoTag" src="" autoplay class="object-contain w-full rounded-t-3xl"></video>
                    <div id="localUsername" class="absolute h-8 w-full bg-gray-700 rounded-b-3xl bottom-0 text-white text-center font-bold pt-1">
                        Me
                    </div>
                </div>
            </div>

            <div class="flex flex-col space-y-2">
                <button id='toggleMicrophone' class="bg-gray-400 w-10 h-10 rounded-md p-2">
                    <svg class="w-6 h-6" fill="none" stroke="currentColor" viewBox="0 0 24 24" xmlns="http://www.w3.org/2000/svg"><path stroke-linecap="round" stroke-linejoin="round" stroke-width="2" d="M19 11a7 7 0 01-7 7m0 0a7 7 0 01-7-7m7 7v4m0 0H8m4 0h4m-4-8a3 3 0 01-3-3V5a3 3 0 116 0v6a3 3 0 01-3 3z"></path></svg>
                </button>

                <button id='toggleCamera' class="bg-gray-400 w-10 h-10 rounded-md p-2">
                    <svg class="w-6 h-6" fill="none" stroke="currentColor" viewBox="0 0 24 24" xmlns="http://www.w3.org/2000/svg"><path stroke-linecap="round" stroke-linejoin="round" stroke-width="2" d="M15 10l4.553-2.276A1 1 0 0121 8.618v6.764a1 1 0 01-1.447.894L15 14M5 18h8a2 2 0 002-2V8a2 2 0 00-2-2H5a2 2 0 00-2 2v8a2 2 0 002 2z"></path></svg>
                </button>

                <button id='toggleScreen' class="bg-gray-400 w-10 h-10 rounded-md p-2">
                    <svg class="w-6 h-6" fill="none" stroke="currentColor" viewBox="0 0 24 24" xmlns="http://www.w3.org/2000/svg"><path stroke-linecap="round" stroke-linejoin="round" stroke-width="2" d="M9.75 17L9 20l-1 1h8l-1-1-.75-3M3 13h18M5 17h14a2 2 0 002-2V5a2 2 0 00-2-2H5a2 2 0 00-2 2v10a2 2 0 002 2z"></path></svg>
                </button>

                <button id='leaveMeeting' class="bg-red-400 text-white w-10 h-10 rounded-md p-2">
                    <svg class="w-6 h-6" fill="none" stroke="currentColor" viewBox="0 0 24 24" xmlns="http://www.w3.org/2000/svg"><path stroke-linecap="round" stroke-linejoin="round" stroke-width="2" d="M17 16l4-4m0 0l-4-4m4 4H7m6 4v1a3 3 0 01-3 3H6a3 3 0 01-3-3V7a3 3 0 013-3h4a3 3 0 013 3v1"></path></svg>
                </button>

            </div>
        </div>
En la sección Implementación de la reunión para unirse , estamos eliminando la hiddenclase del #meetingViewdiv.
En el fragmento de código anterior, hemos creado el #meetingViewdiv, en este contenedor crearemos la interfaz de usuario para la reunión.
Repasemos cada parte del #meetingViewcontenedor y expliquemos su función:
#activeSpeakerContainer- Aquí mostraremos al orador activo si hay varias personas en la reunión, y si es solo una reunión de 2 personas, mostraremos al participante remoto aquí.#activeSpeakerVideo- Esta es la etiqueta de video que mostrará el video del hablante activo#activeSpeakerUsername- Esto contendrá el nombre de usuario del hablante activo
#remoteParticipantContainer- Esto contendrá los mosaicos de video de los participantes remotos#localParticiapntContainer- Crearemos el primer mosaico predeterminado para mostrarle al usuario su propio video#localVideoTag- Etiqueta de video para mostrar el video local que está siendo compartido por el usuario actual#localUsername- Nombre de usuario del usuario actual
#toggleMicrophone- Botón para silenciar/activar el micrófono#toggleCamera- Botón para silenciar/activar cámara#toggleScreen- Botón para compartir pantalla#leaveMeeting- Botón para salir de la reunión#leaveMeetingView- Cuando el usuario abandone la reunión, mostraremos esta vista y ocultaremos la#meetingView
Implementación de la lógica de vista de reunión
Ahora vamos a crear la lógica para conectar la interfaz de usuario de la vista de reunión.
Manejar evento de participantes en línea
El onlineParticipantsevento se desencadena varias veces durante el ciclo de vida de la reunión.
Contiene la matriz de participantes actualmente presentes en la reunión.
Usaremos el onlineParticipantsevento para mostrar la lista de participantes en línea en la reunión.
  meeting.on("onlineParticipants", function(participants) {

    for (let participantInfo of participants) {
        // Checking if a div to hold the participant already exists or not.
        // If it exisits then skipping.
        // Also checking if the participant is not the current participant.
      if (!jquery(`#participant-${participantInfo._id}`)[0] && participantInfo._id !== meeting.participantInfo._id) {
        jquery("#remoteParticipantContainer").append(
          `
          <div id="participant-${participantInfo._id}" class="w-48 h-48 rounded-3xl bg-gray-900 relative">
            <video id="video-${participantInfo._id}" src="" autoplay class="object-contain w-full rounded-t-3xl"></video>
            <video id="audio-${participantInfo._id}" src="" autoplay class="hidden"></video>
            <div class="absolute h-8 w-full bg-gray-700 rounded-b-3xl bottom-0 text-white text-center font-bold pt-1">
                ${participantInfo.name}
            </div>
          </div>
          `
        );
      }
    }
  });
Estamos llenando el remoteParticipantscontenedor con la lista de participantes y también creando videoy audioetiquetando para cada participante.
Actualmente, la etiqueta de video y audio no contiene ninguna transmisión remota, pero agregaremos la transmisión remota a estas etiquetas en el remoteTrackStartedcontrolador de eventos.
Por ahora, solo estamos recorriendo todos los participantes, comprobando si la etiqueta del participante ya existe en el remoteParticipantscontenedor o no.
Si el participante no existe, estamos creando un contenedor para contener la etiqueta de video del participante para mostrar el video, la etiqueta de audio para el audio de los participantes y un campo para contener el nombre de usuario.
Especificamos el id del contenedor como participant-<participant_id>.
Manejo del evento participanteLeft
El evento participanteLeft se desencadena cuando el participante abandona la reunión.
  meeting.on("participantLeft", function(participantInfo) {
    jquery("#participant-" + participantInfo._id).remove();
    if (participantInfo._id === activeSpeakerId) {
      jquery("#activeSpeakerUsername").text("");
      jquery("#activeSpeakerUsername").addClass("hidden");
    }
  });
Eliminaremos el div del participante.
Manejo del evento remoteTrackStarted
El remoteTrackStarted evento se activa cuando los participantes de la reunión comparten su cámara o micrófono. También se activa cuando el usuario se une a una reunión existente donde los participantes ya están compartiendo su cámara o micrófono.
  meeting.on("remoteTrackStarted", function(remoteTrackItem) {
    jquery("#activeSpeakerUsername").removeClass("hidden");

    if (remoteTrackItem.type === "video") {
      let mediaStream = new MediaStream();
      mediaStream.addTrack(remoteTrackItem.track);
      if (jquery("#video-" + remoteTrackItem.participantSessionId)[0]) {
        jquery("#video-" + remoteTrackItem.participantSessionId)[0].srcObject = mediaStream;
        jquery("#video-" + remoteTrackItem.participantSessionId)[0].play();
      }
    }

    if (remoteTrackItem.type === "audio") {
      let mediaStream = new MediaStream();
      mediaStream.addTrack(remoteTrackItem.track);
      if ( jquery("#video-" + remoteTrackItem.participantSessionId)[0]) {
        jquery("#audio-" + remoteTrackItem.participantSessionId)[0].srcObject = mediaStream;
        jquery("#audio-" + remoteTrackItem.participantSessionId)[0].play();
      }
    }
    setActiveSpeaker(remoteTrackItem);
  });
En el manejador de eventos encontraremos el div del remoteParticipanty configurando la srcObjectpropiedad de la etiqueta de video o audio que ya habíamos creado en el onlineParticipantsmanejador de eventos dependiendo del tipo de pista remota.
Al final del controlador de eventos, estamos llamando al setActiveSpeakermétodo. Este método configurará al participante remoto como altavoz activo.
  function setActiveSpeaker(activeSpeaker) {

    if (activeSpeakerId  != activeSpeaker.participantSessionId) {
      jquery(`#participant-${activeSpeakerId}`).show();
    }

    activeSpeakerId = activeSpeaker.participantSessionId;
    jquery(`#participant-${activeSpeakerId}`).hide();

    jquery("#activeSpeakerUsername").text(activeSpeaker.name || activeSpeaker.participant.name);

    if (jquery(`#video-${activeSpeaker.participantSessionId}`)[0]) {
      let stream = jquery(
        `#video-${activeSpeaker.participantSessionId}`
      )[0].srcObject;
      jquery("#activeSpeakerVideo")[0].srcObject = stream.clone();
    }

    if (activeSpeaker.participantSessionId === meeting.participantSessionId) {
      let stream = jquery(`#localVideoTag`)[0].srcObject;
      if (stream) {
        jquery("#localVideoTag")[0].srcObject = stream.clone();
      }
    }
  }
En este método, ocultaremos al usuario remoteParticipantsContainery lo moveremos al activeSpeakerbloque central.
Manejo del evento remoteTrackStopped
Cuando el participante remoto deja de compartir su cámara, pantalla o micrófono, se activa el evento remoteTrackStopped .
  meeting.on("remoteTrackStopped", function(remoteTrackItem) {
    if (remoteTrackItem.type === "video") {
      if ( jquery("#video-" + remoteTrackItem.participantSessionId)[0]) {
        jquery("#video-" + remoteTrackItem.participantSessionId)[0].srcObject = null;
        jquery("#video-" + remoteTrackItem.participantSessionId)[0].pause();
      }

      if (remoteTrackItem.participantSessionId === activeSpeakerId) {
        jquery("#activeSpeakerVideo")[0].srcObject = null;
        jquery("#activeSpeakerVideo")[0].pause();
      }
    }

    if (remoteTrackItem.type === "audio") {
      if (jquery("#audio-" + remoteTrackItem.participantSessionId)[0]) {
        jquery("#audio-" + remoteTrackItem.participantSessionId)[0].srcObject = null;
        jquery("#audio-" + remoteTrackItem.participantSessionId)[0].pause();
      }
    }
  });
En este controlador de eventos, estamos configurando la srcObjectpropiedad en nulo del participante remoto.
Entregando el evento activeSpeaker
El evento activeSpeaker se activa para indicar qué participante está hablando actualmente.
Llamaremos a nuestro setActiveSpeakermétodo que hemos creado previamente en este controlador de eventos.
  meeting.on("activeSpeaker", function(activeSpeaker) {
    setActiveSpeaker(activeSpeaker);
  });
Manejo de palanca de micrófono
Hemos creado un botón con id #toggleMicrophone. Cuando se presione este botón, silenciaremos/activaremos el micrófono.
Para silenciar el micrófono llamaremos al método stopAudio() del SDK de video medido.
Y para cancelar el silencio o compartir el micrófono, llamaremos al método startAudio() del SDK de video medido.
Usaremos una variable global llamada as micOnpara almacenar el estado del micrófono, ya sea que esté actualmente compartido o no.
  jquery("#toggleMicrophone").on("click",  async function() {
    if (micOn) {
      jquery("#toggleMicrophone").removeClass("bg-gray-500");
      jquery("#toggleMicrophone").addClass("bg-gray-400");
      micOn = false;
      await meeting.stopAudio();
    } else {
      jquery("#toggleMicrophone").removeClass("bg-gray-400");
      jquery("#toggleMicrophone").addClass("bg-gray-500");
      micOn = true;
      await meeting.startAudio();
    }
  });
Manejo de alternancia de cámara
Hemos creado un botón con ID #toggleCameracuando se presiona este botón, compartiremos/dejaremos de compartir la cámara.
Para compartir la cámara, llamaremos al método startVideo() de Metered Video SDK.
Para dejar de compartir la cámara llamaremos al método stopVideo() .
En este método también mostraremos la vista previa del video que el usuario está compartiendo actualmente.
Para obtener la transmisión de video local, llamaremos al método getLocalVideoStream() para obtener la transmisión de video actualmente compartida por el usuario.
A continuación, mostraremos la secuencia de vídeo en el#localVideoTag
  jquery("#toggleCamera").on("click",  async function() {
    if (cameraOn) {
      jquery("#toggleCamera").removeClass("bg-gray-500");
      jquery("#toggleCamera").addClass("bg-gray-400");
      jquery("#toggleScreen").removeClass("bg-gray-500");
      jquery("#toggleScreen").addClass("bg-gray-400");
      cameraOn = false;
      await meeting.stopVideo();
      const tracks = localVideoStream.getTracks();
      tracks.forEach(function (track) {
        track.stop();
      });
      localVideoStream = null;
      jquery("#localVideoTag")[0].srcObject = null;
    } else {
      jquery("#toggleCamera").removeClass("bg-gray-400");
      jquery("#toggleCamera").addClass("bg-gray-500");
      cameraOn = true;
      await meeting.startVideo();
      localVideoStream = await meeting.getLocalVideoStream();
      jquery("#localVideoTag")[0].srcObject = localVideoStream;
    }
  });
Cuando el usuario decida dejar de compartir el video, limpiaremos la localVideoStreamvariable deteniendo las pistas de video y también llamaremos al método stopVideo() del SDK de video medido.
Manejo de compartir pantalla
Hemos creado un con id #toggleScreencuando se presiona este botón compartiremos la pantalla.
Para compartir la pantalla, llamaremos al método startScreenShare() del SDK de video medido.
Este método devuelve la transmisión de video de la pantalla que actualmente se comienza a compartir, y configuraremos la transmisión de video localVideoTagpara mostrar la vista previa del usuario de su pantalla que se comparte actualmente.
  jquery("#toggleScreen").on("click",  async function() {
    if (screenSharingOn) {
      jquery("#toggleScreen").removeClass("bg-gray-500");
      jquery("#toggleScreen").addClass("bg-gray-400");
      screenSharingOn = false;
      await meeting.stopVideo();
      const tracks = localVideoStream.getTracks();
      tracks.forEach(function (track) {
        track.stop();
      });
      localVideoStream = null;
      jquery("#localVideoTag")[0].srcObject = null;

    } else {
      jquery("#toggleScreen").removeClass("bg-gray-400");
      jquery("#toggleScreen").addClass("bg-gray-500");
      jquery("#toggleCamera").removeClass("bg-gray-500");
      jquery("#toggleCamera").addClass("bg-gray-400");
      screenSharingOn = true;
      localVideoStream = await meeting.startScreenShare();
      jquery("#localVideoTag")[0].srcObject = localVideoStream;
    }
  });
Para detener el uso compartido de la pantalla, llamaremos al meeting.stopVideo()método y detendrá el uso compartido de la pantalla.
Gestión de la reunión de licencia
Para implementar la reunión de abandono, llamaremos al método LeaveMeeting() del SDK de video medido.
Y ocultaremos la vista de la reunión y mostraremos la Vista de la reunión.
  jquery("#leaveMeeting").on("click", async function() {
    await meeting.leaveMeeting();
    jquery("#meetingView").addClass("hidden");
    jquery("#leaveMeetingView").removeClass("hidden");
}); <div id="leaveMeetingView" class="hidden">
<h1 class="text-center text-3xl mt-10 font-bold">
You have left the meeting
</h1>
</div>Poniendolo todo junto
Aquí está el código final de nuestro meeting.blade.phpque contiene la interfaz de usuario completa de la reunión
<!DOCTYPE html>
<html lang="{{ str_replace('_', '-', app()->getLocale()) }}">
<head>
<meta charset="utf-8">
<meta name="viewport" content="width=device-width, initial-scale=1">
<title>Laravel</title>
<!-- Fonts -->
<link href="https://fonts.googleapis.com/css2?family=Nunito:wght@400;600;700&display=swap" rel="stylesheet">
<style>
body {
font-family: 'Nunito', sans-serif;
}
</style>
<script src="https://cdn.metered.ca/sdk/video/1.4.5/sdk.min.js"></script>
<script>
window.METERED_DOMAIN = "{{ $METERED_DOMAIN }}";
window.MEETING_ID = "{{ $MEETING_ID }}";
</script>
@vite(['resources/css/app.css', 'resources/js/app.js'])
</head>
<body class="antialiased">
<div class="max-w-7xl mx-auto sm:px-6 lg:px-8">
<div id="waitingArea" class="max-h-screen">
<div class="py-4">
<h1 class="text-2xl">Meeting Lobby</h1>
</div>
<div class="max-w-2xl flex flex-col space-y-4 ">
<div class="flex items-center justify-center w-full rounded-3xl bg-gray-900">
<video id='waitingAreaLocalVideo' class="h-96" autoplay muted></video>
</div>
<div class="flex space-x-4 mb-4 justify-center">
<button id='waitingAreaToggleMicrophone' class="bg-gray-400 w-10 h-10 rounded-md p-2">
<svg class="w-6 h-6" fill="none" stroke="currentColor" viewBox="0 0 24 24" xmlns="http://www.w3.org/2000/svg"><path strokeLinecap="round" strokeLinejoin="round" strokeWidth={2} d="M19 11a7 7 0 01-7 7m0 0a7 7 0 01-7-7m7 7v4m0 0H8m4 0h4m-4-8a3 3 0 01-3-3V5a3 3 0 116 0v6a3 3 0 01-3 3z" /></svg>
</button>
<button id='waitingAreaToggleCamera' class="bg-gray-400 w-10 h-10 rounded-md p-2">
<svg class="w-6 h-6" fill="none" stroke="currentColor" viewBox="0 0 24 24" xmlns="http://www.w3.org/2000/svg"><path strokeLinecap="round" strokeLinejoin="round" strokeWidth={2} d="M15 10l4.553-2.276A1 1 0 0121 8.618v6.764a1 1 0 01-1.447.894L15 14M5 18h8a2 2 0 002-2V8a2 2 0 00-2-2H5a2 2 0 00-2 2v8a2 2 0 002 2z" /></svg>
</button>
</div>
<div class="flex flex-col space-y-4 space-x-2 text-sm">
<div class="flex space-x-2 items-center">
<label>
Name:
<input class="text-xs" id="username" type="text" placeholder="Name"/>
</label>
<label>
Camera:
<select class="text-xs" id='cameraSelectBox'>
</select>
</label>
<label>
Microphone:
<select class="text-xs" id='microphoneSelectBox'>
</select>
</label>
</div>
<div>
<button id='joinMeetingBtn' class="inline-flex items-center px-4 py-2 border border-transparent text-sm rounded-md shadow-sm text-white bg-indigo-600 hover:bg-indigo-700 focus:outline-none focus:ring-2 focus:ring-offset-2 focus:ring-indigo-500">
Join Meeting
</button>
</div>
</div>
</div>
</div>
</div>
<div id='meetingView' class="hidden flex w-screen h-screen space-x-4 p-10">
<div id="activeSpeakerContainer" class=" bg-gray-900 rounded-3xl flex-1 flex relative">
<video id="activeSpeakerVideo" src="" autoplay class=" object-contain w-full rounded-t-3xl"></video>
<div id="activeSpeakerUsername" class="hidden absolute h-8 w-full bg-gray-700 rounded-b-3xl bottom-0 text-white text-center font-bold pt-1">
</div>
</div>
<div id="remoteParticipantContainer" class="flex flex-col space-y-4">
<div id="localParticiapntContainer" class="w-48 h-48 rounded-3xl bg-gray-900 relative">
<video id="localVideoTag" src="" autoplay class="object-contain w-full rounded-t-3xl"></video>
<div id="localUsername" class="absolute h-8 w-full bg-gray-700 rounded-b-3xl bottom-0 text-white text-center font-bold pt-1">
Me
</div>
</div>
</div>
<div class="flex flex-col space-y-2">
<button id='toggleMicrophone' class="bg-gray-400 w-10 h-10 rounded-md p-2">
<svg class="w-6 h-6" fill="none" stroke="currentColor" viewBox="0 0 24 24" xmlns="http://www.w3.org/2000/svg"><path stroke-linecap="round" stroke-linejoin="round" stroke-width="2" d="M19 11a7 7 0 01-7 7m0 0a7 7 0 01-7-7m7 7v4m0 0H8m4 0h4m-4-8a3 3 0 01-3-3V5a3 3 0 116 0v6a3 3 0 01-3 3z"></path></svg>
</button>
<button id='toggleCamera' class="bg-gray-400 w-10 h-10 rounded-md p-2">
<svg class="w-6 h-6" fill="none" stroke="currentColor" viewBox="0 0 24 24" xmlns="http://www.w3.org/2000/svg"><path stroke-linecap="round" stroke-linejoin="round" stroke-width="2" d="M15 10l4.553-2.276A1 1 0 0121 8.618v6.764a1 1 0 01-1.447.894L15 14M5 18h8a2 2 0 002-2V8a2 2 0 00-2-2H5a2 2 0 00-2 2v8a2 2 0 002 2z"></path></svg>
</button>
<button id='toggleScreen' class="bg-gray-400 w-10 h-10 rounded-md p-2">
<svg class="w-6 h-6" fill="none" stroke="currentColor" viewBox="0 0 24 24" xmlns="http://www.w3.org/2000/svg"><path stroke-linecap="round" stroke-linejoin="round" stroke-width="2" d="M9.75 17L9 20l-1 1h8l-1-1-.75-3M3 13h18M5 17h14a2 2 0 002-2V5a2 2 0 00-2-2H5a2 2 0 00-2 2v10a2 2 0 002 2z"></path></svg>
</button>
<button id='leaveMeeting' class="bg-red-400 text-white w-10 h-10 rounded-md p-2">
<svg class="w-6 h-6" fill="none" stroke="currentColor" viewBox="0 0 24 24" xmlns="http://www.w3.org/2000/svg"><path stroke-linecap="round" stroke-linejoin="round" stroke-width="2" d="M17 16l4-4m0 0l-4-4m4 4H7m6 4v1a3 3 0 01-3 3H6a3 3 0 01-3-3V7a3 3 0 013-3h4a3 3 0 013 3v1"></path></svg>
</button>
</div>
</div>
        <div id="leaveMeetingView" class="hidden">
            <h1 class="text-center text-3xl mt-10 font-bold">
                You have left the meeting
            </h1>
        </div>
</body>
</html>
El código final de nuestro app.jsarchivo que contiene la lógica de la interfaz de usuario de la reunión
import './bootstrap';
import jquery from 'jquery';

let meetingJoined = false;
const meeting = new Metered.Meeting();
let cameraOn = false;
let micOn = false;
let screenSharingOn = false;
let localVideoStream = null;
let activeSpeakerId = null;
let meetingInfo = {};

async function initializeView() {
    /**
     * Populating the cameras
     */
     const videoInputDevices = await meeting.listVideoInputDevices();
     const videoOptions = [];
     for (let item of videoInputDevices) {
        videoOptions.push(
            `<option value="${item.deviceId}">${item.label}</option>`
        )
     }
    jquery("#cameraSelectBox").html(videoOptions.join(""));

    /**
     * Populating Microphones
     */
    const audioInputDevices = await meeting.listAudioInputDevices();
    const audioOptions = [];
    for (let item of audioInputDevices) {
        audioOptions.push(
            `<option value="${item.deviceId}">${item.label}</option>`
        )
    }
    jquery("#microphoneSelectBox").html(audioOptions.join(""));


    /**
     * Mute/Unmute Camera and Microphone
     */
    jquery("#waitingAreaToggleMicrophone").on("click", function() {
        if (micOn) {
            micOn = false;
            jquery("#waitingAreaToggleMicrophone").removeClass("bg-gray-500");
            jquery("#waitingAreaToggleMicrophone").addClass("bg-gray-400");
        } else {
            micOn = true;
            jquery("#waitingAreaToggleMicrophone").removeClass("bg-gray-400");
            jquery("#waitingAreaToggleMicrophone").addClass("bg-gray-500");
        }
    });

    jquery("#waitingAreaToggleCamera").on("click", async function() {
        if (cameraOn) {
            cameraOn = false;
            jquery("#waitingAreaToggleCamera").removeClass("bg-gray-500");
            jquery("#waitingAreaToggleCamera").addClass("bg-gray-400");
            const tracks = localVideoStream.getTracks();
            tracks.forEach(function (track) {
              track.stop();
            });
            localVideoStream = null;
            jquery("#waitingAreaLocalVideo")[0].srcObject = null;
        } else {
            cameraOn = true;
            jquery("#waitingAreaToggleCamera").removeClass("bg-gray-400");
            jquery("#waitingAreaToggleCamera").addClass("bg-gray-500");
            localVideoStream = await meeting.getLocalVideoStream();
            jquery("#waitingAreaLocalVideo")[0].srcObject = localVideoStream;
            cameraOn = true;
        }
    });

    /**
     * Adding Event Handlers
     */
         jquery("#cameraSelectBox").on("change", async function() {
          const deviceId = jquery("#cameraSelectBox").val();
          await meeting.chooseVideoInputDevice(deviceId);
          if (cameraOn) {
              localVideoStream = await meeting.getLocalVideoStream();
              jquery("#waitingAreaLocalVideo")[0].srcObject = localVideoStream;
          }
      });

      jquery("#microphoneSelectBox").on("change", async function() {
          const deviceId = jquery("#microphoneSelectBox").val();
          await meeting.chooseAudioInputDevice(deviceId);
      });

}
initializeView();

jquery("#joinMeetingBtn").on("click", async function () {
    var username = jquery("#username").val();
    if (!username) {
      return alert("Please enter a username");
    }

    try {
      meetingInfo = await meeting.join({
        roomURL: `${window.METERED_DOMAIN}/${window.MEETING_ID}`,
        name: username,
      });

      console.log("Meeting joined", meetingInfo);
      jquery("#waitingArea").addClass("hidden");
      jquery("#meetingView").removeClass("hidden");
      jquery("#meetingAreaUsername").text(username);

      /**
       * If camera button is clicked on the meeting view
       * then sharing the camera after joining the meeting.
       */
      if (cameraOn) {
        await meeting.startVideo();
        jquery("#localVideoTag")[0].srcObject = localVideoStream;
        jquery("#localVideoTag")[0].play();
        jquery("#toggleCamera").removeClass("bg-gray-400");
        jquery("#toggleCamera").addClass("bg-gray-500");
      }

      /**
       * Microphone button is clicked on the meeting view then
       * sharing the microphone after joining the meeting
       */
      if (micOn) {
        jquery("#toggleMicrophone").removeClass("bg-gray-400");
        jquery("#toggleMicrophone").addClass("bg-gray-500");
        await meeting.startAudio();
      }

    } catch (ex) {
      console.log("Error occurred when joining the meeting", ex);
    }
  });

  /**
   * Handling Events
   */
  meeting.on("onlineParticipants", function(participants) {

    for (let participantInfo of participants) {
      if (!jquery(`#participant-${participantInfo._id}`)[0] && participantInfo._id !== meeting.participantInfo._id) {
        jquery("#remoteParticipantContainer").append(
          `
          <div id="participant-${participantInfo._id}" class="w-48 h-48 rounded-3xl bg-gray-900 relative">
            <video id="video-${participantInfo._id}" src="" autoplay class="object-contain w-full rounded-t-3xl"></video>
            <video id="audio-${participantInfo._id}" src="" autoplay class="hidden"></video>
            <div class="absolute h-8 w-full bg-gray-700 rounded-b-3xl bottom-0 text-white text-center font-bold pt-1">
                ${participantInfo.name}
            </div>
          </div>
          `
        );
      }
    }
  });

  meeting.on("participantLeft", function(participantInfo) {
    jquery("#participant-" + participantInfo._id).remove();
    if (participantInfo._id === activeSpeakerId) {
      jquery("#activeSpeakerUsername").text("");
      jquery("#activeSpeakerUsername").addClass("hidden");
    }
  });

  meeting.on("remoteTrackStarted", function(remoteTrackItem) {
    jquery("#activeSpeakerUsername").removeClass("hidden");

    if (remoteTrackItem.type === "video") {
      let mediaStream = new MediaStream();
      mediaStream.addTrack(remoteTrackItem.track);
      if (jquery("#video-" + remoteTrackItem.participantSessionId)[0]) {
        jquery("#video-" + remoteTrackItem.participantSessionId)[0].srcObject = mediaStream;
        jquery("#video-" + remoteTrackItem.participantSessionId)[0].play();
      }
    }

    if (remoteTrackItem.type === "audio") {
      let mediaStream = new MediaStream();
      mediaStream.addTrack(remoteTrackItem.track);
      if ( jquery("#video-" + remoteTrackItem.participantSessionId)[0]) {
        jquery("#audio-" + remoteTrackItem.participantSessionId)[0].srcObject = mediaStream;
        jquery("#audio-" + remoteTrackItem.participantSessionId)[0].play();
      }
    }
    setActiveSpeaker(remoteTrackItem);
  });

  meeting.on("remoteTrackStopped", function(remoteTrackItem) {
    if (remoteTrackItem.type === "video") {
      if ( jquery("#video-" + remoteTrackItem.participantSessionId)[0]) {
        jquery("#video-" + remoteTrackItem.participantSessionId)[0].srcObject = null;
        jquery("#video-" + remoteTrackItem.participantSessionId)[0].pause();
      }

      if (remoteTrackItem.participantSessionId === activeSpeakerId) {
        jquery("#activeSpeakerVideo")[0].srcObject = null;
        jquery("#activeSpeakerVideo")[0].pause();
      }
    }

    if (remoteTrackItem.type === "audio") {
      if (jquery("#audio-" + remoteTrackItem.participantSessionId)[0]) {
        jquery("#audio-" + remoteTrackItem.participantSessionId)[0].srcObject = null;
        jquery("#audio-" + remoteTrackItem.participantSessionId)[0].pause();
      }
    }
  });


  meeting.on("activeSpeaker", function(activeSpeaker) {
    setActiveSpeaker(activeSpeaker);
  });

  function setActiveSpeaker(activeSpeaker) {

    if (activeSpeakerId  != activeSpeaker.participantSessionId) {
      jquery(`#participant-${activeSpeakerId}`).show();
    }

    activeSpeakerId = activeSpeaker.participantSessionId;
    jquery(`#participant-${activeSpeakerId}`).hide();

    jquery("#activeSpeakerUsername").text(activeSpeaker.name || activeSpeaker.participant.name);

    if (jquery(`#video-${activeSpeaker.participantSessionId}`)[0]) {
      let stream = jquery(
        `#video-${activeSpeaker.participantSessionId}`
      )[0].srcObject;
      jquery("#activeSpeakerVideo")[0].srcObject = stream.clone();
    }

    if (activeSpeaker.participantSessionId === meeting.participantSessionId) {
      let stream = jquery(`#localVideoTag`)[0].srcObject;
      if (stream) {
        jquery("#localVideoTag")[0].srcObject = stream.clone();
      }
    }
  }

  jquery("#toggleMicrophone").on("click",  async function() {
    if (micOn) {
      jquery("#toggleMicrophone").removeClass("bg-gray-500");
      jquery("#toggleMicrophone").addClass("bg-gray-400");
      micOn = false;
      await meeting.stopAudio();
    } else {
      jquery("#toggleMicrophone").removeClass("bg-gray-400");
      jquery("#toggleMicrophone").addClass("bg-gray-500");
      micOn = true;
      await meeting.startAudio();
    }
  });


  jquery("#toggleCamera").on("click",  async function() {
    if (cameraOn) {
      jquery("#toggleCamera").removeClass("bg-gray-500");
      jquery("#toggleCamera").addClass("bg-gray-400");
      jquery("#toggleScreen").removeClass("bg-gray-500");
      jquery("#toggleScreen").addClass("bg-gray-400");
      cameraOn = false;
      await meeting.stopVideo();
      const tracks = localVideoStream.getTracks();
      tracks.forEach(function (track) {
        track.stop();
      });
      localVideoStream = null;
      jquery("#localVideoTag")[0].srcObject = null;
    } else {
      jquery("#toggleCamera").removeClass("bg-gray-400");
      jquery("#toggleCamera").addClass("bg-gray-500");
      cameraOn = true;
      await meeting.startVideo();
      localVideoStream = await meeting.getLocalVideoStream();
      jquery("#localVideoTag")[0].srcObject = localVideoStream;
    }
  });


  jquery("#toggleScreen").on("click",  async function() {
    if (screenSharingOn) {
      jquery("#toggleScreen").removeClass("bg-gray-500");
      jquery("#toggleScreen").addClass("bg-gray-400");
      screenSharingOn = false;
      await meeting.stopVideo();
      const tracks = localVideoStream.getTracks();
      tracks.forEach(function (track) {
        track.stop();
      });
      localVideoStream = null;
      jquery("#localVideoTag")[0].srcObject = null;

    } else {
      jquery("#toggleScreen").removeClass("bg-gray-400");
      jquery("#toggleScreen").addClass("bg-gray-500");
      jquery("#toggleCamera").removeClass("bg-gray-500");
      jquery("#toggleCamera").addClass("bg-gray-400");
      screenSharingOn = true;
      localVideoStream = await meeting.startScreenShare();
      jquery("#localVideoTag")[0].srcObject = localVideoStream;
    }
  });


  jquery("#leaveMeeting").on("click", async function() {
    await meeting.leaveMeeting();
    jquery("#meetingView").addClass("hidden");
    jquery("#leaveMeetingView").removeClass("hidden");
});Nuestro welcome.blade.phparchivo que contiene los controles para unirse a una reunión existente o crear una nueva reunión
<!DOCTYPE html>
<html lang="{{ str_replace('_', '-', app()->getLocale()) }}">
    <head>
        <meta charset="utf-8">
        <meta name="viewport" content="width=device-width, initial-scale=1">

        <title>Laravel</title>

        <!-- Fonts -->
        <link href="https://fonts.googleapis.com/css2?family=Nunito:wght@400;600;700&display=swap" rel="stylesheet">


        <style>
            body {
                font-family: 'Nunito', sans-serif;
            }
        </style>

        @vite(['resources/css/app.css', 'resources/js/app.js'])

    </head>
    <body class="antialiased">

        <div class="max-w-7xl mx-auto sm:px-6 lg:px-8">
            <div class="py-4">
                <h1 class="text-2xl">Video Chat Application</h1>
            </div>


            <div class="max-w-2xl">
                <div class="grid md:grid-cols-8 grid-cols-1 mt-4">
                    <div class="md:col-span-5">
                        <form method="post" action="{{ route('validateMeeting') }}">
                          {{ csrf_field() }}
                        <div class="mt-1 flex rounded-md shadow-sm">
                          <div class="relative flex items-stretch flex-grow focus-within:z-10">
                            <div class="absolute inset-y-0 left-0 pl-3 flex items-center pointer-events-none">
                              <!-- Heroicon name: solid/users -->
                              <svg class="h-5 w-5 text-gray-400" xmlns="http://www.w3.org/2000/svg" viewBox="0 0 20 20" fill="currentColor" aria-hidden="true">
                                <path d="M9 6a3 3 0 11-6 0 3 3 0 016 0zM17 6a3 3 0 11-6 0 3 3 0 016 0zM12.93 17c.046-.327.07-.66.07-1a6.97 6.97 0 00-1.5-4.33A5 5 0 0119 16v1h-6.07zM6 11a5 5 0 015 5v1H1v-1a5 5 0 015-5z" />
                              </svg>
                            </div>
                            <input type="text" name="meetingId" id="meetingId" class="focus:ring-indigo-500 focus:border-indigo-500 block w-full rounded-none rounded-l-md pl-10 sm:text-sm border-gray-300" placeholder="Meeting ID">
                          </div>
                          <button type="submit" class="-ml-px relative inline-flex items-center space-x-2 px-4 py-2 border border-gray-300 text-sm font-medium rounded-r-md text-gray-700 bg-gray-50 hover:bg-gray-100 focus:outline-none focus:ring-1 focus:ring-indigo-500 focus:border-indigo-500">
                            <span>Join Meeting</span>
                          </button>
                        </div>
                        </form>

                      </div>
                      <div class="my-2 sm:my-0 flex items-center justify-center">
                        <span class="text-xs uppercase font-bold text-gray-400 px-1">OR</span>
                      </div>

                      <div class="md:col-span-2">
                        <form method="post" action="{{ route('createMeeting') }}">
                            {{ csrf_field() }}
                            <button type="submit" class="mt-1 inline-flex items-center px-4 py-2 border border-transparent text-sm font-medium rounded-md shadow-sm text-white bg-indigo-600 hover:bg-indigo-700 focus:outline-none focus:ring-2 focus:ring-offset-2 focus:ring-indigo-500">Create New Meeting</button>
                        </form>
                    </div>
                </div>

            </div>

        </div>
    </body>
</html>
Y nuestro web.phparchivo yMeetingContoller.php
<?php

use Illuminate\Support\Facades\Route;

use App\Http\Controllers\MeetingController;
/*
|--------------------------------------------------------------------------
| Web Routes
|--------------------------------------------------------------------------
|
| Here is where you can register web routes for your application. These
| routes are loaded by the RouteServiceProvider within a group which
| contains the "web" middleware group. Now create something great!
|
*/
// URL::forceScheme('https');

Route::get('/', function () {
    return view('welcome');
});

Route::post("/createMeeting", [MeetingController::class, 'createMeeting'])->name("createMeeting");

Route::post("/validateMeeting", [MeetingController::class, 'validateMeeting'])->name("validateMeeting");

Route::get("/meeting/{meetingId}", function($meetingId) {

    $METERED_DOMAIN = env('METERED_DOMAIN');
    return view('meeting', [
        'METERED_DOMAIN' => $METERED_DOMAIN,
        'MEETING_ID' => $meetingId
    ]);
});MeetingController.php
<?php

namespace App\Http\Controllers;

use Illuminate\Http\Request;
use Illuminate\Support\Facades\Http;
use Illuminate\Support\Facades\Log;


class MeetingController extends Controller
{

    public function createMeeting(Request $request) {

        $METERED_DOMAIN = env('METERED_DOMAIN');
        $METERED_SECRET_KEY = env('METERED_SECRET_KEY');


        // Contain the logic to create a new meeting
        $response = Http::post("https://{$METERED_DOMAIN}/api/v1/room?secretKey={$METERED_SECRET_KEY}", [
            'autoJoin' => true
        ]);

        $roomName = $response->json("roomName");

        return redirect("/meeting/{$roomName}"); // We will update this soon.
    }

    public function validateMeeting(Request $request) {
        $METERED_DOMAIN = env('METERED_DOMAIN');
        $METERED_SECRET_KEY = env('METERED_SECRET_KEY');

        $meetingId = $request->input('meetingId');

        // Contains logic to validate existing meeting
        $response = Http::get("https://{$METERED_DOMAIN}/api/v1/room/{$meetingId}?secretKey={$METERED_SECRET_KEY}");

        $roomName = $response->json("roomName");


        if ($response->status() === 200)  {
            return redirect("/meeting/{$roomName}"); // We will update this soon
        } else {
            return redirect("/?error=Invalid Meeting ID");
        }
    }
}
Github
Puede encontrar el repositorio de Github para este proyecto aquí: Aplicación de chat de video grupal con PHP Laravel y JavaScript


Comentarios
Publicar un comentario